Showing posts with label Master File 2. Show all posts

Saturday, January 9, 2010

Part 1, Recipe: Barbecue Tofu (or whatever protein) Chopped Salad

Part 1: "I Don't Know How To Cook"
Recipe: Barbecue Tofu (or whatever protein) Chopped Salad (Master File 2)

Do not fear the tofu!  If you've never tried baked tofu, give it a shot.  It's a far cry from the bland, mushy tofu you may have an aversion to.  If you are absolutely against the idea, put some BBQ sauce on a pound of chicken breasts, pork cutlets, steak, or mix it in with some kidney or garbanzo beans.

Salad is great because it comes together very fast and it's easy to make large amounts to be used as leftovers for lunch.  Start this off by getting the tofu in the oven.

Equipment:
large pot or microwave-safe container
colander
large bowl of ice water
chef's knife
cutting board
big serving bowl
small bowl or mug that fits inside your serving bowl


Ingredients:
1 block firm or extra firm tofu, well drained
barbeque sauce, about 1 cup
4 ounces green beans
3 large carrots
4 celery stalks
1 ear yellow corn
1 red bell pepper
1 small red onion
1 head romaine lettuce
Barbecued Tofu, warm (see recipe)
1 1/4 cups (about) Ranch Dressing
Sea salt and freshly ground black pepper, to taste
3/4 cup grated cheddar cheese

Method:
Preheat oven to 325 degrees.

To drain tofu, wrap the whole block in 3 sheets of paper towel or a clean dish towel.  Put a plate on top and weigh it down with some canned goods or books.  Let it sit for as long as possible while you get the rest of your equipment ready.

Line a cooking sheet with aluminum foil. This will help make cleaning up easier. Spoon a thin layer of barbecue sauce across the lined pan.  Start a large pot of water on high heat (unless you want to cook some veggies in the microwave - your choice).  Wash your veggies.  Put your colander in the sink.  Prepare a large bowl of ice water.

Slice pressed tofu into 1/2 inch thick cutlets and place in pan. Spoon a layer of sauce across the top of the tofu and bake for approximately one hour, checking occasionally so as not to overcook.  Don't worry too much about the hour cooking time.  If you finish your veggies well beforehand and you're really hungry, then by all means eat.  You can put the tofu under the broiler for a minute to get some caramelization too.  Tofu is done cooking when sauce has baked in and tofu is moist, but not saucy.

To trim your green beans, line up a handful and cut the ends off.  Then turn them around and cut the other ends off.  You can use kitchen shears to cut the ends off but that takes forever.  Cut your trimmed green beans and carrots into bite-sized pieces.

If you're not using a microwave, add the green beans to your boiling water and cook for 30 seconds.  Add the carrots in with the green beans and cook for 30 seconds, or until the green beans and carrots are bright and crisp-tender.  

If you are using a microwave, put the green beans and carrots in a microwave-safe dish, add three tablespoons or so of water, cover with plastic wrap or (preferably) wax paper, and nuke on high for 1 minute, or until they're bright and crisp-tender.

Drain the green beans and carrots and immediately place them in a bowl of ice water to cool. Drain again, then pat them dry (be sure they are very dry).

Put a small bowl or mug inside your large serving bowl.  Stand your ear of corn on this little platform and use your knife to slice the kernels off the cob.  Remove the corn for now.  If you want to wash the bowl to make it pretty again that's up to you.

Cut your celery and bell pepper into bite-size pieces.  Use the onion chopping method you learned this week to chop the red onion, but make sure you make your cross cuts as close together as you can so you get a fine chop.

Combine the green beans, carrots, celery, corn kernels, bell pepper, and onion in a bowl.  The vegetables will keep for 1 day, covered and refrigerated.

Cut the warm tofu into 3/4-inch pieces.

Lop the root end off the lettuce and cut off any discolored ends.  Roughly chop or tear the lettuce into bite-sized pieces.  Toss the lettuce and veggies in your serving bowl with however much dressing you prefer, and season it to taste with salt and black pepper.  Scatter the tofu pieces and cheese over the salad and serve.

Easy BBQ Tofu recipe source
Barbecue Tofu Chopped Salad recipe source

Friday, January 8, 2010

Part 1, Lesson 2: Mise En Place

Part 1: "I Don't Know How To Cook"
Lesson 2: Mise En Place
Recipe: Lo Mein (Master File 2)

A common mistake people make is just diving straight into a recipe without reading it first.  They'll get something started on the stove and -- oh crap, there's some time-consuming step they need to finish right away before whatever is on the stove burns to a crisp.  Read every recipe before you begin.

Did you notice on the last recipe that all of the chopping and cutting was done before any actual cooking took place?  This is called mise en place ("meez en plaahs") and it's very important for quick cooking things like stir-fry.  You should have all your ingredients and equipment out, in place, and ready to go.

I can't emphasize enough the importance of mise en place, especially if you've got a family buzzing around distracting you while you're trying to cook.

Let's talk about lo mein, or at least the American version of lo mein.  It's basically stir-fry with noodles.  It's extremely important that every little bit of the ingredients and equipment are prepared before the first drop of oil hits the pan.  Once you get started cooking it will move very quickly and you don't want anything to overcook or burn.

I won't judge you if you use ramen, but it's really not the healthiest option.  In that case you'll be frying noodles that have already been fried.

Equipment:
large pot
chef's knife
cutting board
wok or large frying pan
wooden spoon or spatula to stir with

Ingredients:
8 oz pkg lo mein noodles, spaghetti, or 2 packages of ramen (flavor packets discarded)
Any combination of the following vegetables:
   carrots
   red bell pepper
   mushrooms, sliced
   broccoli, chopped
   baby corn
   bok choy
   zucchini
   edamame, shelled
   snow peas
   bean sprouts
   green onions, green and white parts sliced diagonally into 2" lengths
Protein of your choice: chicken, tofu, shrimp, seitan, tempeh; chopped into 1" cubes (optional)
2 tbsp peanut, canola, or vegetable oil
2 tsp sesame oil
1 cup vegetable or chicken broth
4 tbsp soy sauce
2 cloves garlic, minced
2 tsp cornstarch
salt and pepper, to taste

Method:
Put a large pot of water on over high head.  Keep an eye on it and when it's at a full rolling boil cook your noodles according to the package directions.  Set your timer.  Drain when they're done.  Meanwhile,  get everything else ready.

Wash your veggies.  You don't have to peel your carrots, just make sure they're scrubbed well.  If you're using whole mushrooms, you can either carefully wipe each one with a damp paper towel or say screw it and rinse them under running water and drain well.  They say that mushrooms can get waterlogged if you do this.  I've never experienced this problem, nor have I noticed any difference in flavor, texture, or juiciness when comparing a wiped and rinsed mushroom side-by-side.  Then again, I don't eat raw mushrooms so maybe that's where the difference lies.  If you use baby corn in a can please drain and rinse away the extra sodium.

Combine sesame oil, broth, soy sauce, garlic, and cornstarch.  Set aside.

Start with the carrots.  We're going to julienne these, or turn them into thin matchsticks.  Begin by cutting off a thin sliver from the side of the carrot to create a stable base to set it on.  Cut off the ends.  Cut the carrot into halves or thirds so you have roughly 2-3" lengths.  Cut down each piece lengthwise so you have long planks.  Cut each plank into matchsticks.  Set aside.

Do the same with the red pepper.  See the last recipe for full instructions on seeding and cutting into planks.  Cut the planks into matchsticks and set aside.

Cut the stems off your mushrooms if they're dark or woody.  Slice them and set aside.

I like to separate broccoli into two parts, the green froofy part and the stalk, and treat each as a separate vegetable.  Chop or separate the froofy part into bite-sized florets.  Cut off the bottom woody part of the stalk and peel using a vegetable peeler.  You can eat the leaves so don't worry if you get a few in your stir-fry.  Now cut the stalk into planks and then matchsticks.  Set aside.

Not much you need to do with baby corn except drain and rinse.

Bok choy kind of looks and tastes like a cross between celery and lettuce.  Cut off the root end and chop the whole head crosswise.

To julienne zucchini, shave a little bit off the bottom like you did for your carrot so it doesn't roll around on you.  Slice off the ends, then slice downwards into planks.  Planks into matchsticks.

If you're using frozen edamame, microwave until they're defrosted.  De-shell if necessary.

If your snow peas have stringy ends on them, cut them off.  You probably won't need to since they're so tender.

Please tell me you're using fresh bean sprouts, not canned.  Rinse them very well.  If you're using canned, please note that they will make this whole dish taste like cheap canned chow mein.  That is so not what we're going for here.

Trim the tops of your green onions to get rid of any discolored or dry spots.  Trim off the root but leave as much of the white part as possible.  Slice them (on the diagonal if you're feeling fancy) into 2" lengths all the way down to the white end.

Veggies are ready!  Make sure your noodles are done and drained before you go any further.

Heat a wok or the biggest frying pan you have over medium-high heat.  Put 2 Tbsp peanut/canola/vegetable oil in there and swirl it around to coat.  Stir-fry the vegetables in the order listed above, one at a time, until crisp-tender, about 5 minutes.

Push off to the side and stir-fry your protein until cooked.  Alternately, if your wok or pan is too small for this, you can cook the protein before the veggies, remove, and return it to the pan with the noodles.

Add noodles and sauce.  Stir everything around until sauce begins to boil, then lower heat and simmer until thick, about 5 minutes.  Season to taste with salt and pepper.  You can garnish with additional chopped green onions and crushed red pepper if you like.

Thursday, January 7, 2010

Part 1, Recipe: Roasted Vegetable and Fish Tacos

Part 1: "I Don't Know How To Cook"
Recipe: Roasted Vegetable and Fish Tacos (Master File 2)
 
Hopefully you have a sharp chef's knife now.  You're going to need it.  Before you do anything you need to learn how to hold the knife.  Go here and look at the picture at the bottom of the page.  It might feel weird at first, especially if you (like me) used to hold your knife with your index finger pointed down the top of the knife.  The correct hold will give you a ton more control and greatly reduce the chances of you cutting off any digits.

Today we'll be making tacos.  If you don't like fish use cooked chicken, shrimp, tofu, seitan, or tempeh.  Read through the entire recipe before you begin.  It looks long but it goes quick.

Equipment:
chef's knife
cutting board
broiler pan
baking sheet/sheet tray/cookie sheet/jelly roll pan (whatever you call it)
cooking spray
aluminum foil
paper towel or tea towel

Ingredients:
1 lb white fish such as cod, halibut, walleye, trout, or tilapia (find the best choice here)
3 Tbsp vegetable oil
cumin
chili powder
oregano
cayenne pepper (optional)
salt & pepper
2 medium zucchini
1 large tomato
1 green pepper
1 red pepper
1 medium onion
3 cloves garlic
1 lime
1/2 cup sour cream or crema
1/4 cup cilantro
salsa (optional)
8 taco size flour tortillas


Method:
Wash all your vegetables well.  This includes the lime. Spray your baking sheet with cooking spray and set aside.

Start with the bell peppers.  Cut off the tops and bottoms and set aside.  You will now have bell pepper tubes with seeds inside.  Either reach in and yank out the seeds and membranes or stick your knife in and cut them out.  Don't worry about getting every last seed.  They're not going to hurt you.  Stand the tubes up and cut the peppers into thirds or fourths so you end up with planks of pepper.  Cut each plank into sticks 1/2" wide.  (Having trouble gauging 1/2 inch?  The tip of your index finger to the first knuckle is more than likely 1 inch long.)  Then rotate the sticks 90 degrees and chop into 1/2" square pieces.  Dump these unceremoniously onto your baking sheet.

Move on to the onion.  It has an end where the green parts came off (top) and an end with whiskery roots (bottom).  Cut off the top.  Stand the onion on its top so that it's stable and cut the whole thing in half right through the root end.  Now you can easily remove the skin from each half.  Take one half at a time and lay it down with the root end near your non-dominant hand and the cut top end facing your knife hand.  Get down so the onion is at eye level.  You're going to take your knife and hold it parallel to the cutting board.  Slice through the onion halfway up but stop before you go through the root end.  The root is going to hold everything in place while you work.  Now you can stand up again.  Slice the onion from bottom to top (1/2" inch slices), but again don't slice through the root end.  Now make perpendicular slices across the grain (1/2" again) of the onion and voila!  Perfectly uniform chopped onion!  Put the onion with the peppers on your baking sheet.

Now would be a great time to preheat your oven to 400 degrees F.

Next we'll deal with the zucchini.  This is going to be cake compared to the onion.  Slice off the top and bottom, cut it in half lengthwise, then slice into 1/2" thick half moons.  These go to the baking sheet.

Garlic time.  Pull the cloves off of the bulb and put them on your cutting board.  Lay your knife on top of one and either pound down with your fist or push down until the clove smushes and cracks.  You can slip the skins off easily now.  Cut each bulb in half, lay the flat surface down, and chop the garlic into a not-so-fine mince.  Onto the baking sheet with these.

We'll do the tomato last because it goops up the cutting board.  Cut out the core at the top of the tomato using the tip of your knife.  If this scares you, use a paring knife.  You just want to cut out a cone-shaped wedge around the part where the stem comes off. Cut the tomato in half along its equator and use your finger to scoop out the seeds and pulp.  Lay each cut half down on the cutting board.  We're going to cut it into slices similar to how we made that first cut into the onion so get down so you're eye level with the tomato.  With your hand on top of the tomato and your knife parallel to the cutting board make 1/2" slices up the tomato starting from the bottom.  Slice all the way through.  Now you have tomato planks, more or less.  Cut each plank into 1/2" sticks and each stick into 1/2" pieces.  I know the tomato is irregular and squishy.  Just do your best here.  These go onto the baking sheet.

Now drizzle about two tablespoons of oil over everything on the baking sheet.  Sprinkle with a hearty pinch of salt and pepper.  Use your hands and mix everything together so the veggies are all coated with oil.  Arrange everything to take up the entire pan in a single layer if possible.  Put this in the oven and set your timer for 15 minutes.

Wipe the tomato goo off your cutting board and dry.

Pick or cut off a 1/4 cup of cilantro leaves.  You can have some of the top part of the cilantro stems in there without it being woody and overpowering so don't worry about it.  Give the cilantro a rough chop.  Put them in a smallish bowl with 1/2 cup of sour cream and the juice from half of the lime.  Stir and let it sit so the flavors marry.  Cut the other half of the lime into wedges.

Stir the veggies after 15 minutes.

Set your timer for 10 minutes.

Prepare the fish by drying the fillets off with some paper towel.  Brush each side with a little bit of oil.  Sprinkle salt and pepper on both sides.  Sprinkle each side with cumin, chili powder, a bit of oregano, and cayenne if using.  Spray a broiler pan with cooking spray and place fish on it.

Wrap your tortillas in aluminum foil and set aside.

When your veggie timer goes off check and see if you can stick a fork into a piece of pepper.  Things should be crisp-tender.  If it's too much on the crisp side keep checking every five minutes until done.  Once those are done take them out and set them aside for a minute.  Crank up your broiler.  While that gets nice and hot move the veggies into a serving bowl and cover loosely with foil.

Put your foil tortilla package into the main part of the oven.

Put the fish under the broiler and set the timer for five minutes.  Flip the fish over and set your timer for three minutes.  Check the fish every minute after that because when things go bad in a broiler, they go bad fast.  Now is not the time to wander into the other room to watch TV or check your email.  You're looking for completely opaque fish that flakes easily with a fork and has clear juices.

Pull the fish out, cut into pieces or strips, and serve on warm tortillas with the veggies, sour cream, lime wedges, and salsa if you insist.

Leftovers Idea:
If you have leftover veggies, put them into some eggs in the morning.

Wednesday, January 6, 2010

Part 1, Lesson 1: Knife Skills

Part 1: "I Don't Know How To Cook"
Lesson 1: Knife Skills

I think that a big hurdle for people to overcome when they claim they can't cook is some basic skills that seem scary but are actually simple and absolutely essential.  The biggest of these basic things is knife skills.  Theoretically you can go to the grocery store and get pre-cut veggies and meats from the salad bar or pre-packaged and pre-cut stuff from the produce section, but that is wasteful (packaging!), expensive, and severely limits your options. 

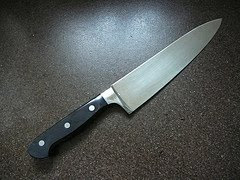
Photo by pstuifzand on Flickr
It's time to learn how to use those knives.  Even if your knives are hand-me-downs from your college days.

There's a little homework involved here.  It's boot camp, remember?  Time to get up and take some action if you want to change your life.  First, go to your kitchen and grab your biggest knife that isn't a cleaver (you have a cleaver?  Scary).  You should have either a chef's knife or a santoku.  If you don't have either one of these, you will need to get one.  You will use this knife more than any other knife in your kitchen.  I personally recommend going with a chef's knife that is at least 8" long, preferably 10".  If you really don't have a ton of money to run out and pick up a Wusthof or Henckels or whatever, go grab one from the dollar store.  Yes, the dollar store.  It will last you about a month and that's enough time to learn.  Of course, it would be best if you could get an actual decent knife that will last you 20-30 years.  If you spend $20 at Target you'll get a pretty OK knife for the money.  And for the love of dog, don't buy anything from an infomercial or door-to-door salesperson.

OK.  So you have your chef's knife.  You might want to pick up a paring knife too if the size of the knife intimidates you.  You can get a nice one or you can get a three-pack at the grocery store.  Whatever.

Eventually you'll want a serrated bread knife too.  Since you can't sharpen a serrated blade it's OK to go lower end on these because you just have to replace them when they get dull.  These three knives are all you really need.

Do you already have a chef's knife?  Let me guess -- it's so dull you just end up smashing or tearing whatever you're trying to cut.  Yup, you and almost everyone in America.  So your homework is to find a place to get it sharpened.  You don't have to spend a bunch of money on this; in fact it'll probably be free.  Here in the Twin Cities there is a chain of grocery stores called Lunds and Byerlys who sharpen knives for free overnight at the meat counter.  It wouldn't hurt to ask your local butcher or meat counter if they'd sharpen yours for you.  If you're coming up dry there, go to Google Maps and type "knife sharpening near Minneapolis" or wherever you live.  Without the quotes, of course.

Do not skip this step.  You absolutely have to start with a sharp knife if you want to learn how to use it.

So how do you use it?  Here comes...

Your Homework
Read some articles and watch some videos.  Answer the following questions in your RFBC Journal:
1. How do you properly hold a chef's knife? 
2. What is the proper order to cut up a potato into small pieces?
     a) planks, stabilize, matchsticks, dice
     b) stabilize, planks, matchsticks, dice
     c) stabilize, matchsticks, planks, dice
3. How can you quickly and easily dice an onion?

Let's Practice With A Meal Plan
This meal plan has been designed so you can practice cutting, chopping, slicing, and dicing.

Here's Master File 2 with menu, shopping list, and recipes.  I have detailed the play-by-play directions for each recipe.
Photo credit: http://www.flickr.com/photos/pstuifzand/ / CC BY-NC-SA 2.0